If you’re learning how to draw or if you’re trying to draw something you haven’t really drawn before, then you might end up using references as a tool to help you learn.
Basically, a reference is a picture (usually a photograph) of something, someone or somewhere which you use as a guide to help you to draw whatever it is you want to draw. Now, you’ve probably also heard some saying or other along the lines of “use a reference as a starting point, not a template” or something like that.
If you’re puzzled by this saying, then it basically means that, whilst it’s ok to use your reference as a guide to help you draw things, you should remember to use your own imagination and not to be afraid of changing things.
In other words, you should use your reference as the “skeleton” which supports your own individual drawing rather than just copying the reference picture as closely as possible.
I’m not an expert on the subject of copyright and references but, to my understanding, it’s ok to use reference images to learn how to draw things which can’t, in themselves, be copyrighted (eg: positioning, lighting, perspective etc…). However you should at the very least substantially change the content of what you are drawing if you are using a reference and don’t have the relevant permissions.
For example: you can use a photo of someone sitting on a chair as a reference for your drawing – but the person and the chair in your finished drawing should look very different to the person and the chair in the photo etc….
Usually it’s a good idea to take reference photos yourself or to draw things which you can see. But, since this isn’t always practical, you may end up using other things as references. But, copyright aside, it’s a good idea to only use reference images as a starting point for your drawings in order to ensure that you produce something unique and to ensure that your imagination and creativity isn’t limited by your choice of reference images.
Ok, so how do you use a reference photo?
In this article, the reference photo will be an uncopyrighted photo from Wikipedia of a member of the American Navy doing some target practice on the deck of a ship.
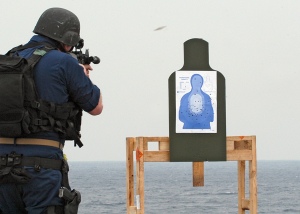
From Wikipedia: “PACIFIC OCEAN (Feb. 4, 2008) A member of the visit, board, search and seizure (VBSS) security force aboard the amphibious dock landing ship USS Harpers Ferry (LSD 49) fires his weapon on the firing range during a target practice drill. The VBSS team is training on various weapons and boarding procedures to enhance their proficiency skills when boarding and searching vessels. U.S. Navy photo by Mass Communication Specialist 2nd Class Joshua J. Wahl (Released)”
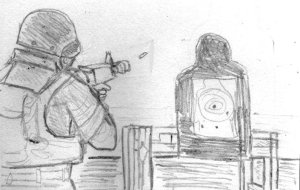
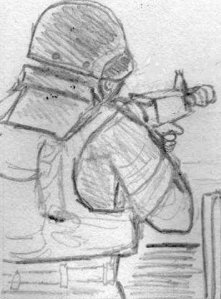
Now, the first thing to do with this reference image is to draw a sketch of it in pencil.
If you’re new to sketching, then remember to focus only on the important details of the picture (eg: the sailor, the outline of his rifle and the target) rather than every tiny detail of the picture (eg: all the various straps on his backpack, every part of his rifle etc..).
Be sure to pay attention to the lighting in the image too (eg: if any parts of the photo are lighter than the other parts). For example, the edge of the side panel on the sailor’s helmet is slightly lighter than the rest of his helmet or the side of the panel.
Whilst you can add a little bit of detail to your sketch, you should focus on drawing the outlines of everything important in the drawing and try to copy it as closely as possible.
Once you’ve done that, you should end up with something like this:
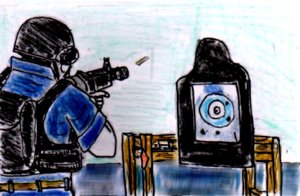
Congratulations! You now know how to draw someone firing a rifle. Well, unless you go over this sketch in pen, add colour and more detail.
If you do that, then you will have only learnt how to draw one particular sailor firing a rifle. You will also have lost your reference sketch and you will end up with something like this (albeit without the digital effects):
Yes, it looks like a fairly reasonable (if somewhat simple) copy of the original photo. But where is the imagination? Where is the creativity?
Whilst you may have picked up a few pointers about drawing techniques, you won’t really have created anything new. And, if you used a copyrighted photo as your reference, you probably wouldn’t be able to publish it without permission either.
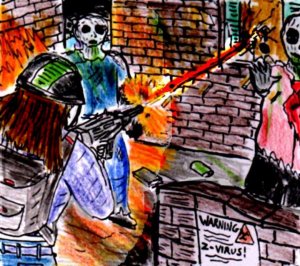
But, since you didn’t make that mistake, you will still have your original pencil sketch. Now, let’s think of what else we can draw which involves someone firing a rifle. I know! How about something involving zombies?
So, for a drawing involving zombies, the only part of our sketch that we will need is the person firing a rifle, so we can get rid of the rest….
Ok, what can we change about this person? Well, since it’s only drawn in pencil, we can change pretty much everything (apart from the perspective and positioning).
For example, we can turn the backpack into an ordinary backpack rather than a military style one, we can change the military helmet into a bicycle helmet, we can change the person’s military uniform into civilian clothes, we can give the person long hair, we can make their rifle look slightly different, we can change the person in the drawing into a woman, we can add a dramatic muzzle flare to the rifle etc….
As long as the person in your drawing is standing in roughly the same position as the person in your sketch, then you can change anything that you want to. Once you’ve done that, then turn your sketch into a proper drawing and just add the zombies and the background (and any digital effects you want to add too). You should end up with something like this:
Of course, this is just one example. But I hope that it helped to show you how to use a reference image in an imaginative and innovative way 🙂
[…] Coloured Pencils“ – “Can You Call Yourself An ‘Artist?‘” – “Using Reference Photos For Your Drawings (With Examples… And Zombies)“ – “Six Benefits Of Being A Self-Taught Artist“ – “How The Best Stories […]
[…] Reference images: I’ve already written about how to use a reference image, so I won’t really be talking about this subject here. However, photos, illustrations, […]