Although I’m fairly good at drawing people, I have nowhere near as much practice when it comes to drawing animals.
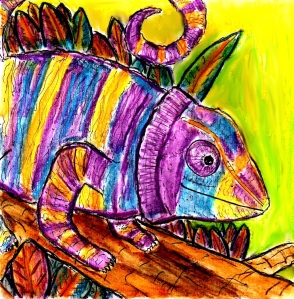
But, most of the time, this isn’t really too much of a problem because I know enough basic drawing skills and techniques to be able to work out how to draw (and paint) most animals fairly quickly. Like this chameleon:
And, well, I thought that I’d share some of these basic skills and techniques which most artists use when drawing animals they’ve never drawn before (or anything else unfamiliar) with you. There’s nothing particularly new or spectacular in this article, but I hope that it at least points you in the right direction.
1) Find references: First of all, go online and search for as many pictures as you can of the animal in question, taken from as many angles as possible.
If you can actually take a look at the animal in question in real life, then this can be better – although there are advantages to be able to look at a still image for a long time and study it carefully.
So, perhaps, if you get to see a real example of the animal in question – then maybe take a couple of photos.
Anyway, once you’ve got your reference photos, then we can move on to the next stage.
2) Study them: Take a careful look at your reference photos and study them closely.
Pay close attention to things like the precise shape of the animal’s head (eg: the exact outline of it rather than the shape you imagine it to be), the texture of their skin etc… Also, be sure to look at how different the animal looks when it is photographed from different angles too.
Remember, photos are actually two-dimensional images which trick the viewer into thinking that they’re looking at a three-dimensional scene. So, the exact shapes and outlines of things in photos might look slightly different to what you expect them to look like.
If you’ve been drawing for a while, you’ll probably already have a good instinct for this – but it can be kind of confusing if you’re new to drawing. So, study your photos carefully.
Once you’ve done this get your sketchbook. Although your final drawing or painting shouldn’t be a direct copy of any of your reference pictures, you’ll need to do some…..
3) Practice: Using a pen or a pencil, try exactly copying the most important parts of your reference photos to get some practice at drawing the animal (or the exact outline of it at least) from several different angles.
Ideally, you should copy your references the old-fashioned way by looking at them and then trying to draw them yourself. But, if you’re totally new to drawing – then you can cheat and trace the outlines original pictures (either by hand or digitally), but don’t make a habit of this. Copying by sight alone is one of the most useful and important skills that an artist can learn.
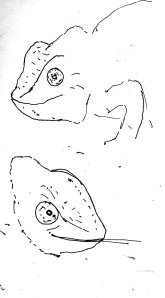
For example, before painting my chameleon picture, I looked at a couple of public domain photos on Wikipedia/ Wikimedia Commons (I got the idea to look there from a Shoo Rayner video, I can’t remember which one) and tried to copy the exact shape of the chameleon’s head:
Practising is important, because it allows you to make mistakes and learn in your sketchbook rather than in your finished picture. Not only that, it helps you to feel more confident when it comes to drawing the animal in question.
4) Simplify: This is something which many artists do automatically and something which you should probably do (or learn to do) when you’re practising.
Generally speaking, you don’t have to copy literally every detail of your reference photos (eg: every feather on a bird’s wings etc…) when you’re practising. You just have to learn how to draw the most important parts of the animal (eg: it’s eye, the outline of it, it’s mouth, the shape of it’s wings and legs etc…).
The reason for this is that these are the parts of the animal that your audience will probably focus on when they look at your final picture, so these are the most important things to get right.
For the rest of the animal (eg: it’s fur, it’s feathers etc…), all you really need to do is to give the impression of detail (eg: lots of squiggly lines to denote feather or fur, lots of small curved lines to denote scales etc…) and your audience’s imaginations will fill in the gaps.
5) Bring it all together: Once you’ve learnt how to draw a simplified version of the animal from several different angles through copying and you can imagine what the animal looks like in three dimensions, then it’s time to use your own creativity and create your completely new and original final picture.
Try drawing or painting the animal in a different position or from a different angle to the ones in your reference photos, try drawing the animal with a different expression etc… the only limits are your own imagination and level of artistic knowledge.
——-
Sorry that this guide was so basic, but I hope it was useful 🙂


[…] – “Three Sneaky Ways To Spread Out The Good Stuff In Your Story” – “How To Draw An Animal, Any Animal” – “One Thing That Sci-Fi Writers Can Easily Get Wrong” – “A Strange […]